Browse help topics
Generate invoice batches
Turn your ready rows into invoice batches and an NDIS claim CSV.
Last updated · 3 September 2026
Generating is the core billing action. It takes every Ready to bill row, splits it by funding type, and creates the right output for each: an NDIS claim file for NDIA rows, and PDF invoices for plan-managed and self-managed rows. The rows then move to Invoiced.
Check the ready rows
Go to Finance›Billing. The line under the Ready to bill heading counts the rows and totals, then tells you how Generate will split them into NDIA, plan-managed and self-managed batches. Clear anything still in Needs reconfirmation first: those rows are never picked up by Generate, no matter how long they sit there.
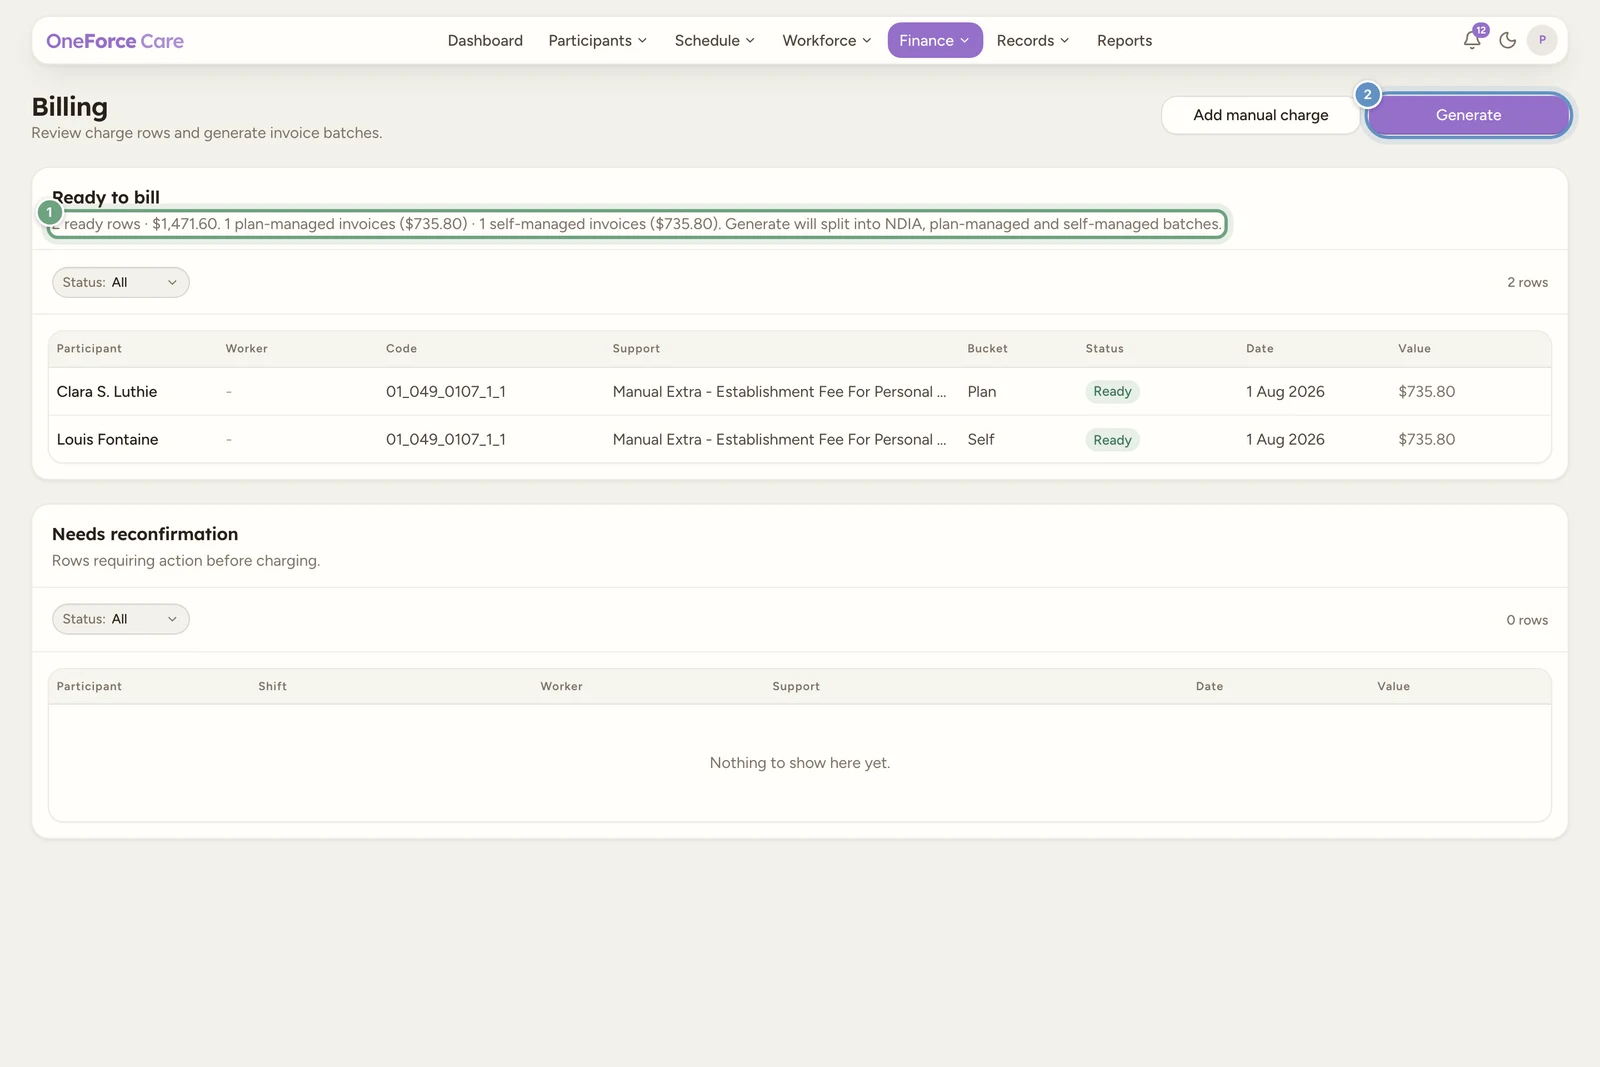
Select Generate
Select Generate at the top right. If nothing is ready, you see “There are no ready charge rows to generate.” and nothing else happens; resolve your Needs reconfirmation rows first.
Otherwise the platform checks every ready row one more time before it commits to anything:
- A whole batch type can fail on its own. If your provider invoicing setup is incomplete (see below) or, for an NDIA batch, your NDIA organisation ID is missing, that entire batch type is skipped with an error toast explaining what to fix, plus a warning: “Skipping [batch type] until the issues above are fixed. The remaining batch types can still be generated.” The other batch types still open for confirmation.
- A single row can fail on its own without stopping its batch or anyone else’s. Typical causes: a claim over the 2-year NDIS payment-request limit; an NDIA row missing a field the claim file needs (participant NDIS number, dates, quantity, GST code); or a plan-managed or self-managed row missing its invoice recipient name or email, support code, or a valid quantity, price or GST code. These rows are listed individually in the confirm dialog rather than blocking everyone else.
- Older NDIA claims get a heads-up, not a block. If any NDIA-managed row was delivered more than 90 days ago, or any row (NDIA or not) more than 12 months ago, you see a warning toast first: “N claim(s) may be queried or held for review by the NDIA due to their age. …” Generation still proceeds; the NDIA may query or hold these for review (up to 28 days) once submitted.
Confirm the batch
A confirm dialog opens, titled Generate invoice batch? (or Generate invoice batches? when more than one funding type is involved), with the total row count and value underneath. It lists each batch with its row count and total, and notes “This will create the following batches, mark the included charge rows as invoiced, and make them available in Payments.” If an NDIA batch is included, it adds “The NDIS CSV will download after the NDIA batch is generated.”
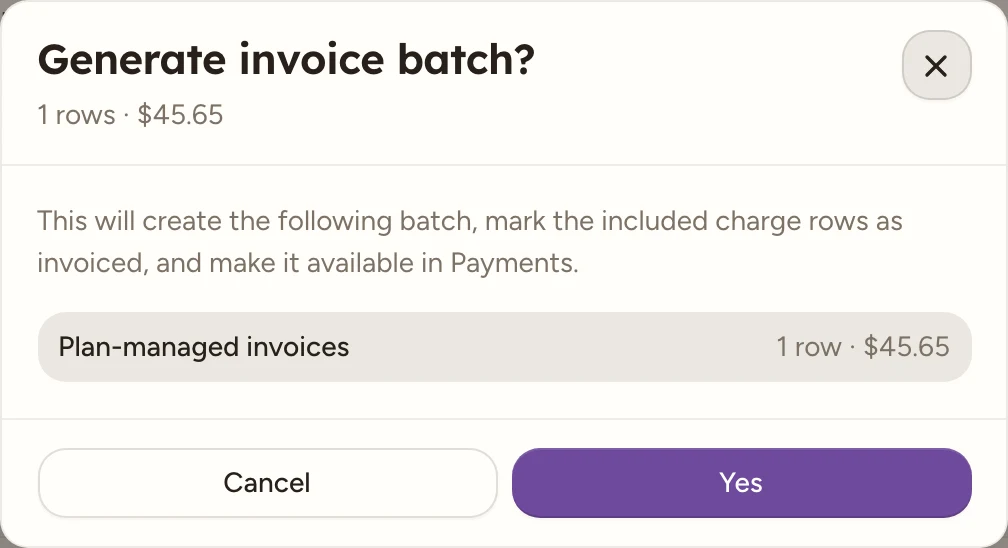
Select Yes to go ahead, or Cancel to step back without creating anything.
Deal with any blocked rows
If any rows failed the checks in the previous step, a wide panel appears under the batch list headed “N rows can’t be billed”, with the explainer “Archiving removes these rows from the register. Untick a $0 row to include it in billing instead.” Each blocked row gets its own line in a table:
| Column | What it holds |
|---|---|
| Archive | A tickbox, ticked by default. Ticked means the row is archived when you confirm. |
| Participant | Who the row belongs to. |
| Support | The support the row is charging for. |
| Reason | Why it cannot be billed, in the same words as the Needs reconfirmation register. |
Underneath, a running count reads “N rows will be archived when you confirm.”
Most rows can only be archived: their tickbox is fixed on and cannot be cleared. The one exception is a plan-managed or self-managed row blocked only because its quantity or its unit price is zero. That row can be unticked, which bills it as a genuine $0 line instead of archiving it. NDIA rows are never untickable, because the NDIS bulk claim file cannot carry a zero-unit line.
Watch out
Archiving is not the same as excluding. An archived row leaves the Billing register for good; it is kept in your finance history for audit, but it will not come back to be billed later. If the row is worth fixing, select Cancel, correct it from the register, and generate again.
Collect the outputs
Each funding type produces its own batch:
| Bucket | Output |
|---|---|
| NDIA | NDIS claim rows, exported as a bulk claim CSV |
| Plan | Plan-managed PDF invoices |
| Self | Self-managed PDF invoices |
Mixed is not a fourth bucket. A participant on a Mixed plan sets a funding management per budget pool on their NDIS plan, and each charge row follows the pool it is funded from, so one participant’s rows can land in two or three different batches. A row whose pool has no concrete funding type never reaches Generate at all: it stays in Needs reconfirmation reading “Funding type not set. Set it to NDIA, plan, or self-managed on the NDIS plan.” until the pool is set to one of the three. When an NDIA batch is generated, the NDIS bulk claim CSV downloads automatically, ready to upload to the NDIA portal; a batch over 5,000 rows (the NDIA’s per-file cap) downloads as several sequentially numbered CSV files instead of one. You see “Invoice batch generated.” (with a count when more than one batch is created), the rows move to Invoices, and the batches appear on Payments.
If every blocked row was archived and nothing billable is left, you see “N rows archived. Nothing left to generate.” instead.
Invoices go to Xero on their own
If your organisation is connected to Xero, generating also pushes the new plan-managed and self-managed batches into Xero as draft invoices, in the same action. You do not have to go to Payments and push them by hand.
- The toast tells you it happened: “Invoice batch generated and pushed to Xero.”, or “N invoice batches generated and pushed to Xero.” for more than one.
- If the push fails, the batch is still generated. The toast turns to a warning: “Invoice batch generated. The Xero push failed, retry from Payments.” Nothing is lost, and you can push it again from Payments.
- NDIA batches never push to Xero. An NDIA claim is lodged through the NDIS portal, not invoiced, so that bucket only downloads its CSV.
- With no Xero connection, the toast is simply “Invoice batch generated.” and nothing else changes.
Note
The invoices land in Xero as drafts, so nothing is sent to a payer from Xero until your bookkeeper approves them. See Push invoices to Xero for what each Xero field is filled from, and for pushing a batch by hand.
Before your first batch: provider setup
Plan-managed and self-managed batches need your provider invoicing details, and an NDIA batch also needs your NDIA organisation ID. These live in two places:
- Account›Invoicing: Default GST code, Registered for GST, bank details (account name, BSB, account number), remittance email, payment terms. See Invoicing settings.
- Account›Organisation: your ABN and NDIA organisation ID. See Organisation settings.
If anything is missing or wrong, Generate skips that batch type before creating it and tells you what to fix, for example:
- “Provider invoicing setup incomplete: …” (a required field is blank, for example the default GST code, ABN, or bank account name)
- “Provider invoicing setup invalid: …” (for example the ABN needs 11 digits, or the BSB needs 6)
- “Provider NDIA organisation ID is required for the NDIS CSV.” (needed for the NDIA batch only)
Tip
After generating, head to Payments to record money received and, for an NDIA batch, to reconcile the claim results once the NDIA returns them.
GST on your invoices
Every charge row carries a GST code. Shift-backed rows take it from the support; manual charges take your Default GST code from Account›Invoicing (see Add a manual charge). It controls how the row appears on the plan-managed or self-managed PDF invoice:
- P1 - 10% GST. The rate you enter or agree is already GST-inclusive; the platform never adds GST on top. The invoice carves the GST out of the line for display (the line amount divided by 11), and the totals section shows “Subtotal (excl. GST)” and “GST” underneath.
- P2 - GST Free. The default for NDIS supports. The line shows “GST-free” instead of a dollar figure, and if every line on an invoice is GST-free the totals section reads “GST (GST-free supplies)” against $0.00, rather than a bare zero.
- P5 - GST out of scope. No GST applies at all; the line shows a dash.
The NDIS price limit for a support is a GST-inclusive ceiling, so your entered rate is compared to it directly for both P1 and P2, with no 10% added first.
Separately, whether the PDF is headed TAX INVOICE or INVOICE depends on your Registered for GST setting under Account›Invoicing, not on the GST code of any one line. A GST-registered provider still issues a Tax Invoice even when every line on it is GST-free (P2); an unregistered provider’s PDF says INVOICE and adds a “Not registered for GST” line underneath the heading. This changes only the invoice’s title and that one line, never any amount.