Browse help topics
Assign a worker
Open a shift, manage assignments, pick a worker and support code, choose Automatic or Required acceptance, then publish.
Last updated · 23 September 2026
A new shift has no worker. To roster one, open the shift and work through its assignments. The NDIS support code is chosen here, per worker, not on the create form.
Before you choose a worker
The worker needs approved availability covering the whole shift. A blank calendar does not mean they are free, and a pending submission is not approval. This check applies when saving an assignment, even if you are not publishing it yet, and when changing a shift’s time.
Open Workforce > Availability to check their hours. For permanent workers, set regular hours or a one-day change. For casual workers, request their availability and review the submission. Leave and hours the worker has withdrawn can block new assignments while a change is still being reviewed.
Availability and shift acceptance are separate: approved hours make someone eligible to be rostered; Worker acceptance controls whether they must answer that particular shift.
Open the shift and manage assignments
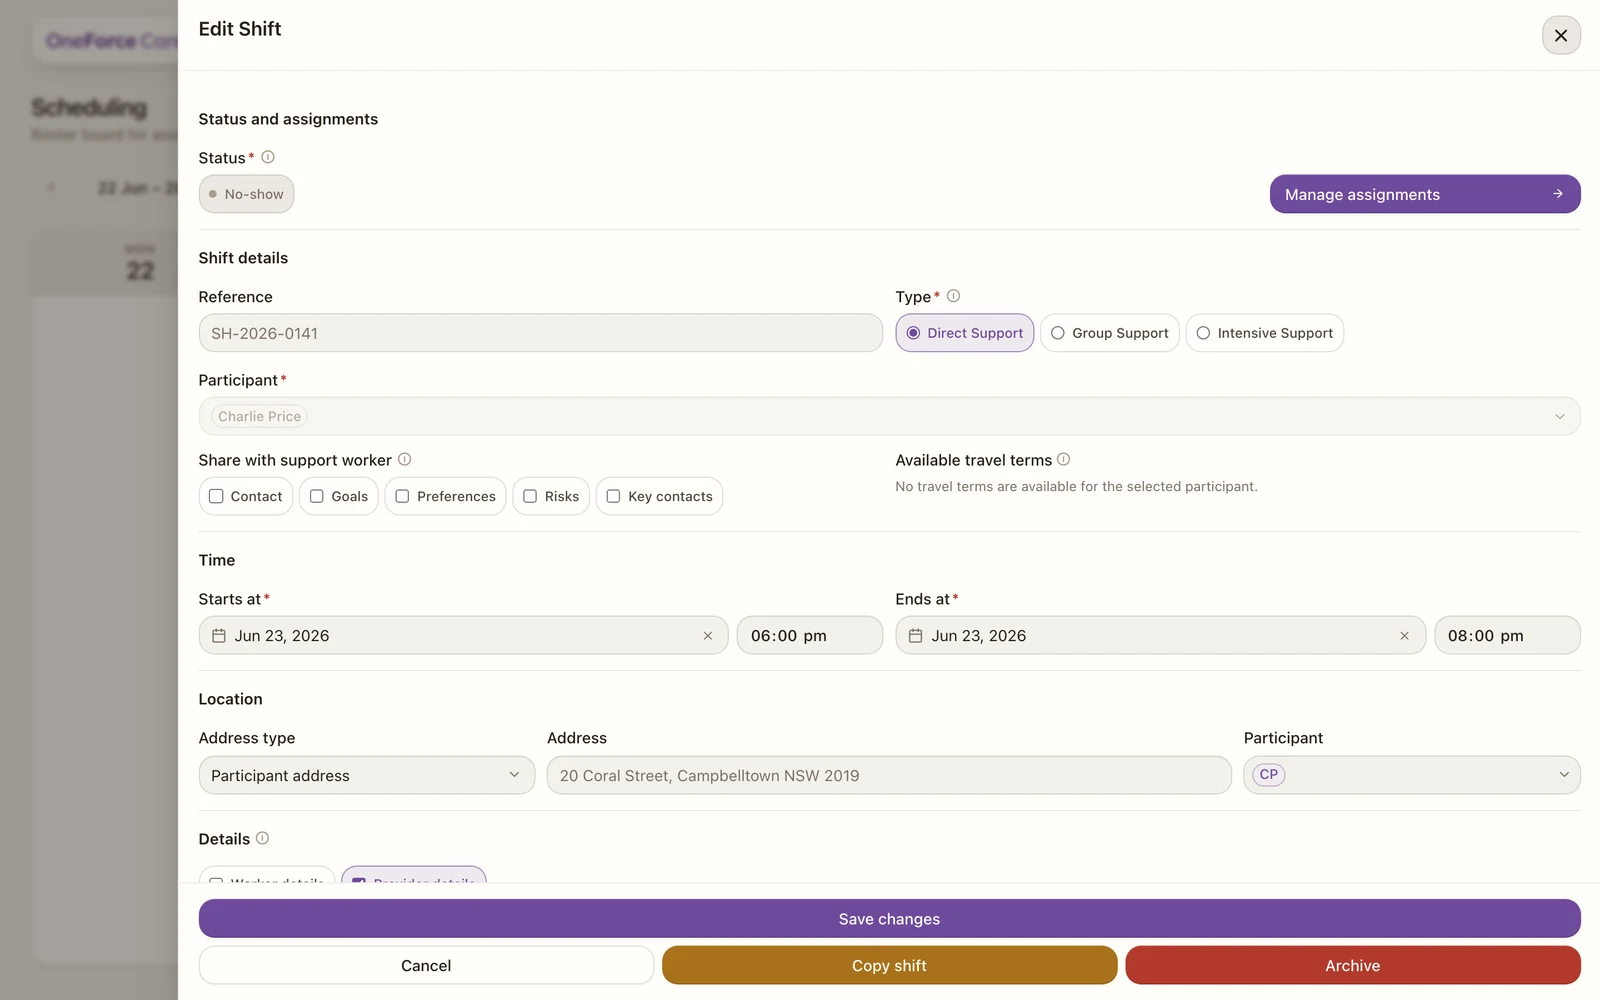
Select the shift on the Planner or Table to open the Edit Shift drawer. Its Status and assignments section shows the shift’s current status pill on the left and a Manage assignments button on the right.
Decide whether the worker has to accept
Worker acceptance is the third field on the Shift details row, after Reference and Type. Two pills:
| Setting | What happens when you publish |
|---|---|
| Automatic (default) | The worker is booked as soon as you publish. Nothing is asked of them. |
| Required | The worker must accept the shift in their app before they can clock in or start travel, and you are told straight away if anyone declines. |
It stays editable after you publish, and only locks when work actually starts (a worker clocks in, or provider travel begins) or the shift is cancelled. Switching it on for an already-published shift sends the request immediately; switching it off clears the outstanding request but keeps the answer the worker already gave. Copying a shift carries the setting across.
Note
There is no workspace-wide default and no feature toggle for this. Every shift starts on Automatic, so nothing changes for your existing roster until you choose otherwise on a shift.
Add a worker
The Worker assignments drawer opens, with an Assignments summary (“N assignments / N published / N completed”) at the top. On a shift that asked for acceptance, the summary also carries “/ N confirmed”, and each assignment tab shows its own Awaiting worker, Accepted or Declined badge.
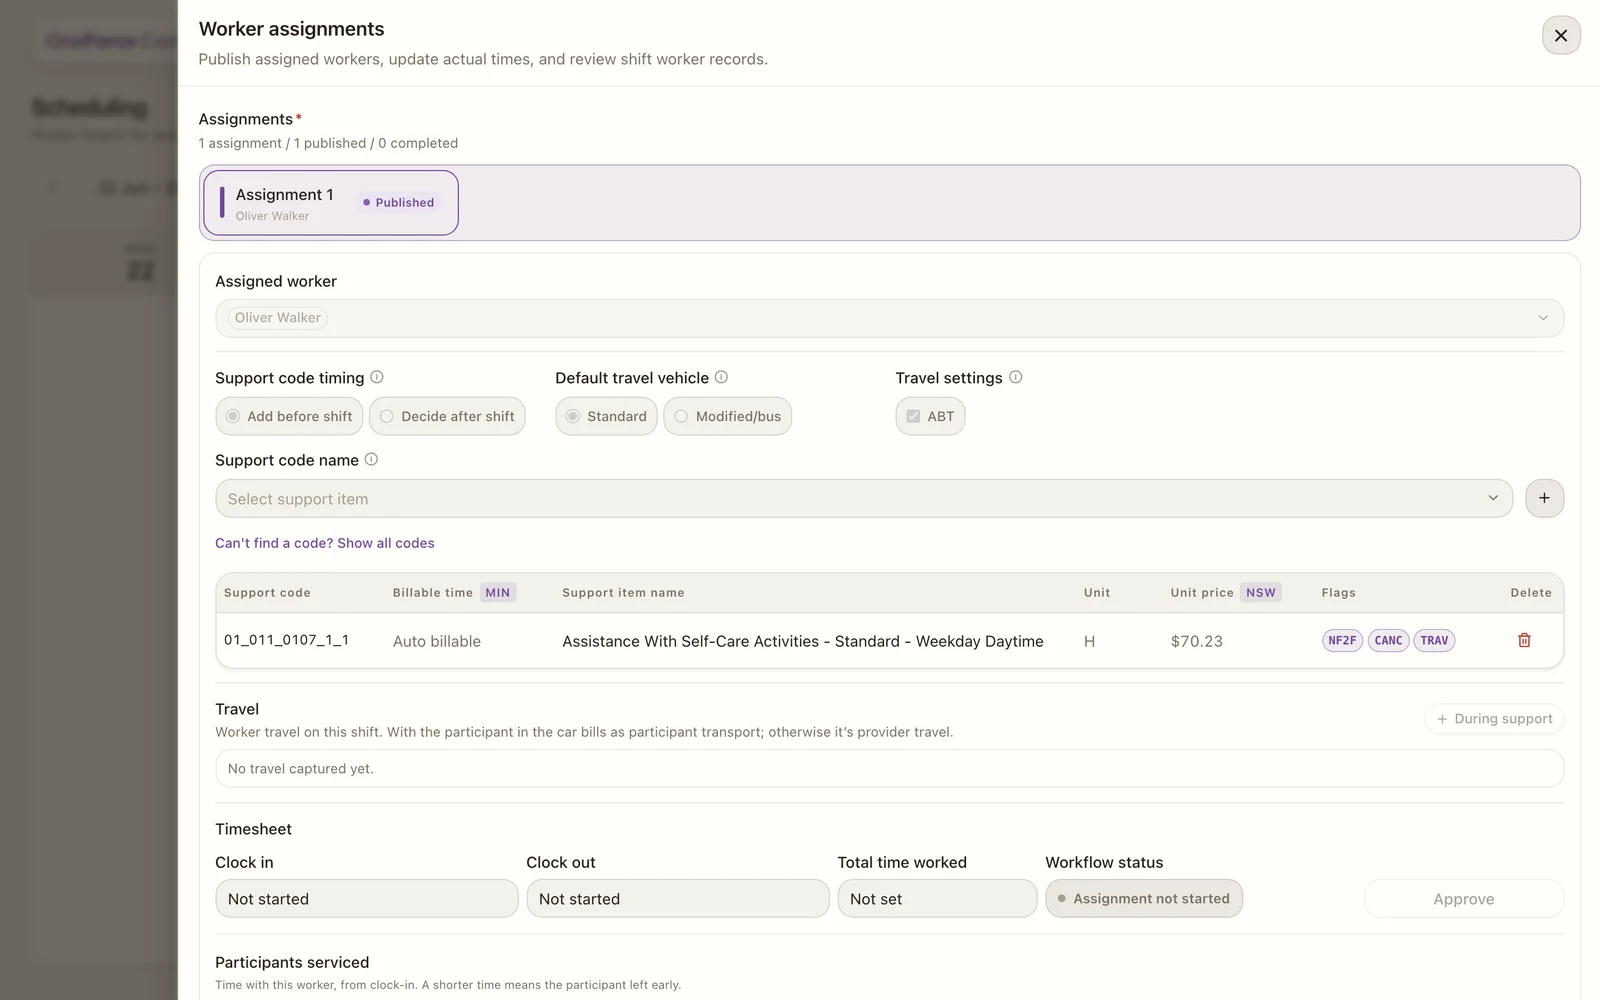
How you add workers depends on the shift’s type:
- Direct Support has a single assignment. Pick the worker under Assigned worker.
- Group Support starts with one assignment. Select Add assignment to add another (only enabled while participants remain unallocated), then pick a worker for each and use Participants for this assignment to attach the participants that worker looks after. Each tab reads “N participants attached · N remaining · 1:N finance split”. Every assignment lands on its own tab, labelled Assignment 1, Assignment 2 and so on, showing the worker’s name and a status badge; a tab can be removed with its × unless it is the first assignment, published, or already started.
- Intensive Support has no per-assignment worker picker. Use the Assigned workers multi-select at the top instead: adding a worker there creates an assignment for them, and removing one deletes it (unpublish first if it is published). Every worker serves the shift’s one participant.
 1
1Note
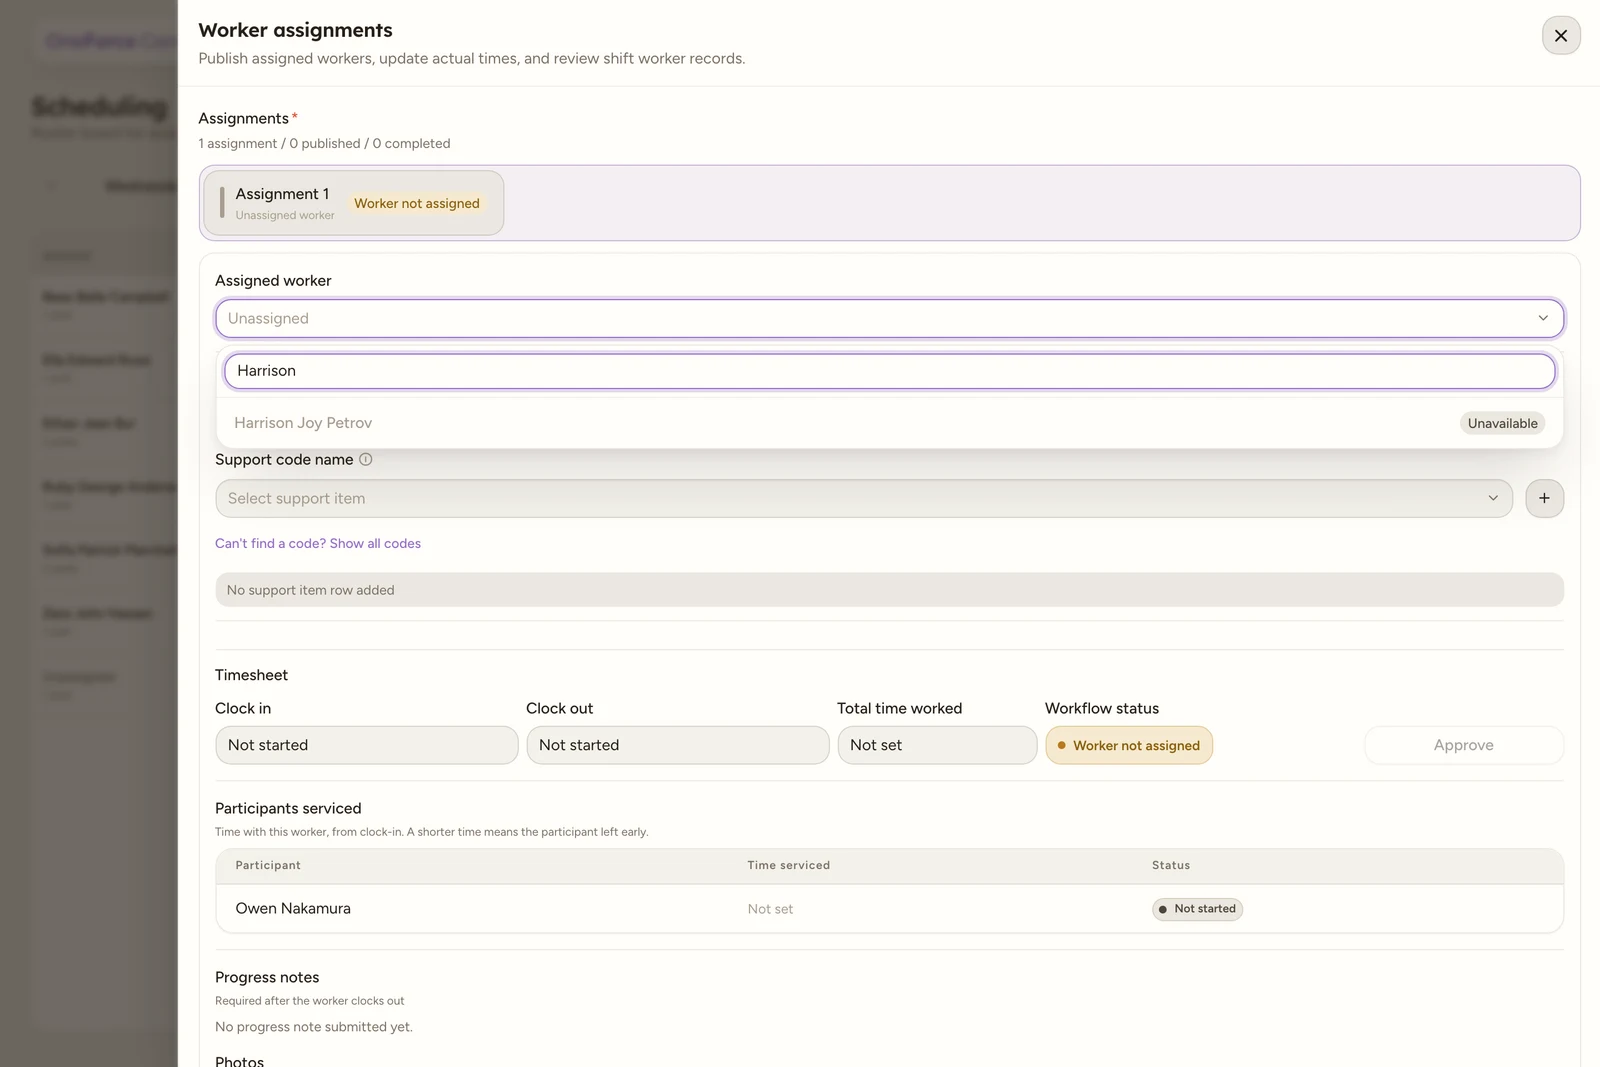
A worker who is not available for the shift’s time still appears in the picker, but greyed out with an Unavailable badge, and cannot be selected. This applies to both the single Assigned worker picker and the Intensive Assigned workers multi-select. A worker already booked on an overlapping shift is left out of the single picker entirely.
Set the support code timing and codes
Support code timing sets whether you add the code now (Add before shift) or confirm it after delivery (Decide after shift, which opens the picker once the worker submits progress notes). It locks once the assignment is published or work starts.
Under Support code name, search for the support item and select the + button to add it to the assignment; it appears in a table below with its quantity. Add more than one code if the assignment bills more than one support item. If you cannot find a code, select Can’t find a code? Show all codes to widen the list beyond the recommended set.
Note
Publishing checks that every assignment has a worker and at least one support item (for group support, that every participant is allocated to an assignment), and that the worker is available for the shift’s time. A toast tells you exactly what is missing.
Publish the assignment
Select Publish to send the assignment to the worker. The shift appears in their mobile app, and the status moves to Published.
Publishing is not always the end of it:
- On an Automatic shift it is. The worker is booked and can clock in when the time comes.
- On a Required shift the status moves to Awaiting worker instead, and the worker is asked to accept or decline in their app. Until they accept, they cannot clock in, start travel, log a break or report an incident on that shift. When they accept, the status reads Accepted. If they decline, the assignment unpublishes itself, the shift reads Declined, and you are notified.
To take an assignment back, select Unpublish and confirm Unpublish assignment?, which removes it from the worker’s mobile schedule until it is published again.
Tip
After a decline, adjust the shift or pick another worker and publish again. The question is asked afresh each time you publish, and the worker’s earlier answer is kept for the record. See Shift statuses.
Tip
After the worker has clocked in and out, come back to approve their times: Review and approve assignments.