Browse help topics
NDIS plan
Plan details, funding type, the three budget pools, the Stated versus Flexible rule, and starting the next plan.
Last updated · 3 September 2026
The NDIS Plan tab is the funding behind everything. Service agreements, the utilisation view and every claim read from what you enter here, so it is worth getting right. Open the participant, then select the NDIS Plan tab.
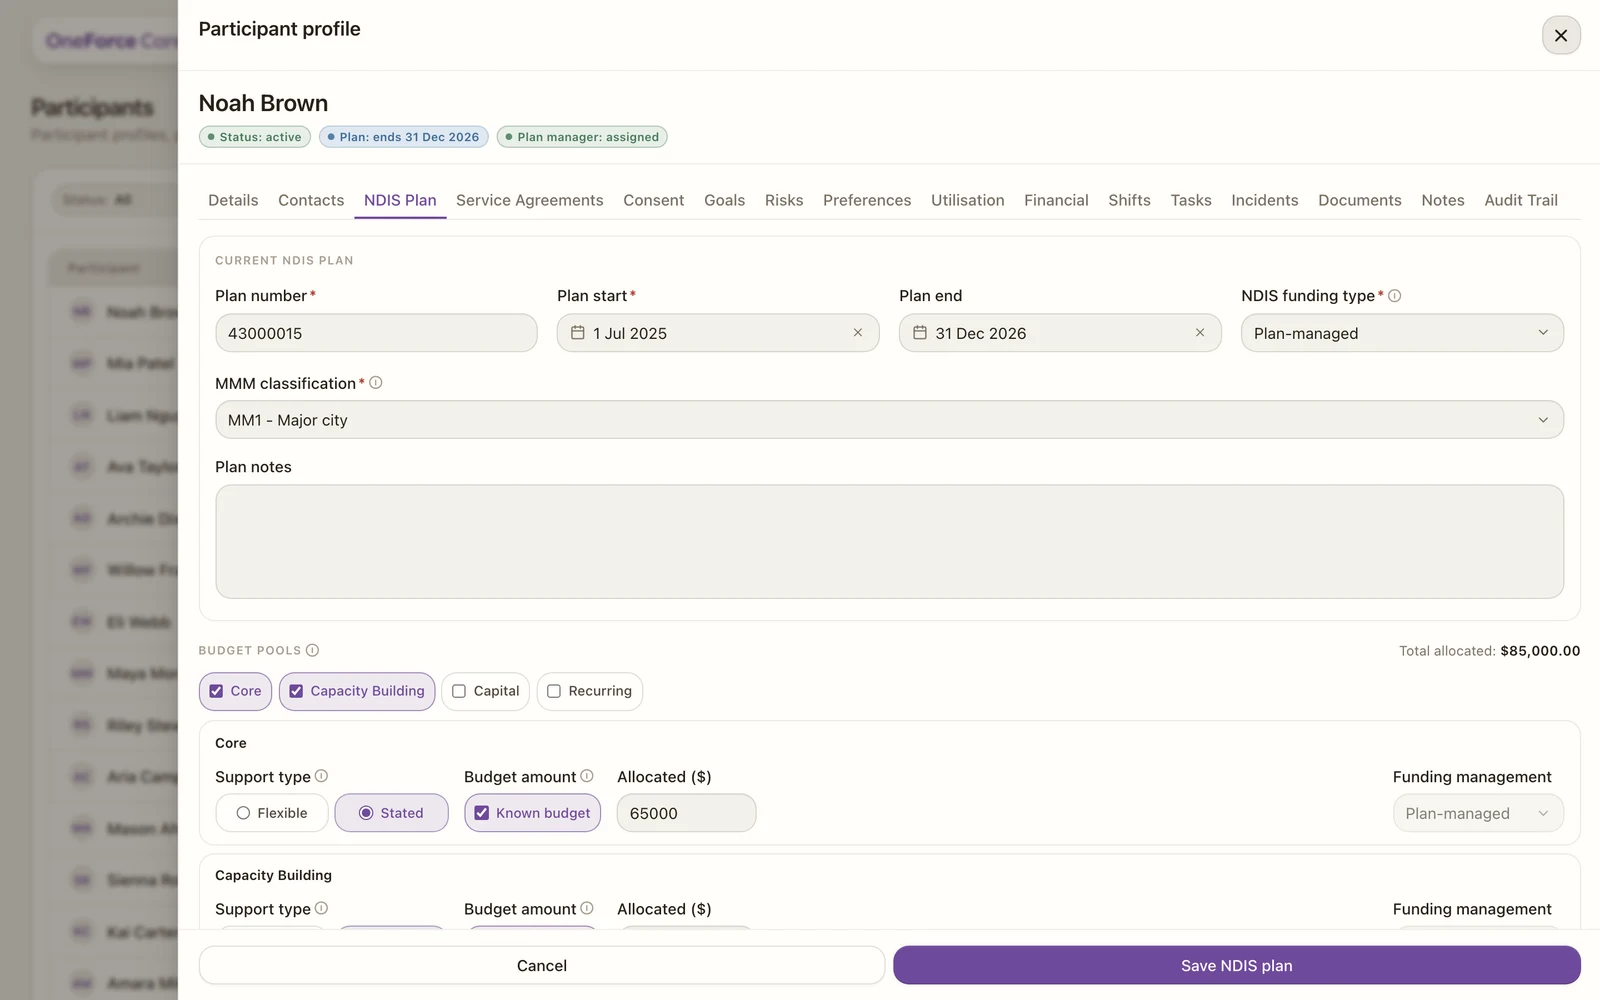
Plan details
| Field | Required | Notes |
|---|---|---|
| Plan number | Yes | Enter the reference as issued |
| Plan start | Yes | Date picker |
| Plan end | No | Leave blank for an ongoing plan |
| NDIS funding type | Yes | How the plan is managed and paid |
| MMM classification | Yes | Modified Monash Model remoteness level |
| Plan notes | No | Internal notes about the plan |
NDIS funding type decides which invoice contacts a service agreement will need:
- Plan-managed: a plan manager pays your invoices, so you invoice the plan manager.
- Self-managed: the participant (or their nominee) pays your invoices, so you invoice them.
- NDIA-managed: you claim directly from the NDIA, so no invoice contact is needed.
- Mixed: different budget pools are managed differently. When you pick Mixed, you set the funding management on each pool below.
An NDIA-managed plan, or a Mixed plan with an NDIA-managed budget pool, also needs your provider’s valid NDIA organisation ID. The provider owner records this under Account > Organisation.
MMM classification is the remoteness level (MM1 major city through to MM7 very remote). It affects NDIS price limits and how much provider travel time you can claim.
Budget pools
A plan funds up to three claimable pools. Tick the ones this plan includes, and a card appears under the tick boxes for each. At least one is required. A Total allocated figure appears at the right of the section heading once there is something to add up, summing the known amounts across the ticked pools.
- Core: everyday support, community participation, consumables and transport.
- Capacity Building: per-category funding to build independence and skills over time.
- Capital: assistive technology and home modifications.
The NDIA pays periodic transport allowances straight to the participant on a schedule, so there is no pool for them here: nothing is claimed against them and their balance is not visible to you.
For each pool you tick, set:
- Support type: Flexible or Stated (see below).
- Budget amount: tick Known budget and enter the Allocated ($) value once the amount has been confirmed. Leave it unticked while the figure is still unknown, and the pool records as unknown rather than zero.
- Funding management: only editable when the plan’s funding type is Mixed; otherwise it follows the plan’s funding type.
Stated versus Flexible (the one to get right)
This is the most important choice on the plan, because it changes what the service agreement requires.
Watch out
Flexible means any support in that category can be claimed, so you do not have to list specific support codes. Stated locks the budget to specific supports, so you must add the matching NDIS support codes on the service agreement. If a Stated pool has no codes, shifts that draw on it have nothing claimable and cannot be invoiced.
Core is the only pool you can set to Flexible. Capacity Building funding is allocated per support category and cannot be moved between categories, and Capital funding is tied to the specific approved items, so under NDIS rules both are always Stated. Their Support type pills still show, with Stated selected and both options locked, and the hint beside the label explains why.
Save the plan
Select Save NDIS plan. You need a valid Plan number, an NDIS funding type and at least one budget pool, or the form tells you what to fix. If the plan or one of its Mixed budget pools is NDIA-managed and the provider ID is missing or invalid, you see NDIA-managed plans require a valid NDIA organisation ID. Enter it in Account > Organisation, or ask the provider owner to do so, then try again. Once saved, the plan can be linked to a service agreement and starts driving utilisation and claiming.
Start a new plan at reassessment
When the participant is reassessed, do not overwrite the plan on screen. Select Start new plan in the footer instead, which appears once a plan has been saved. The form clears ready for the successor: enter the new plan number, dates and reassessed allocations, with the funding type, remoteness level and ticked pools carried across as a starting point. The footer changes to Cancel and Start new plan, so Start new plan is the button that saves it.
Note
Starting a new plan ends the current plan and creates a successor. The old plan and its budgets are kept for history, and claims already made stay linked to it, so nothing you have delivered or invoiced is disturbed. Select Cancel to back out and return to the current plan untouched.