Browse help topics
Service agreements
Link the plan, choose signing, add agreed supports, set claim readiness and invoicing, then create, send, cancel or re-send the agreement.
Last updated · 23 September 2026
A service agreement records the supports you have agreed to deliver, the terms you can claim under, and (optionally) collects signatures. Open the participant, then select the Service Agreements tab.
You need a saved NDIS plan first
You can only build an agreement once the participant has a saved NDIS plan. Until a plan exists the tab shows Complete the NDIS plan first. The agreement links to the current plan automatically, so the Linked NDIS plan field is read-only; you do not pick the plan yourself.
A saved agreement shows at the top of the tab with its status, with the establishment-fee prompt above it when one applies. The form below is where you set the signing method, claim readiness and invoicing, then update the agreement or create the next one.
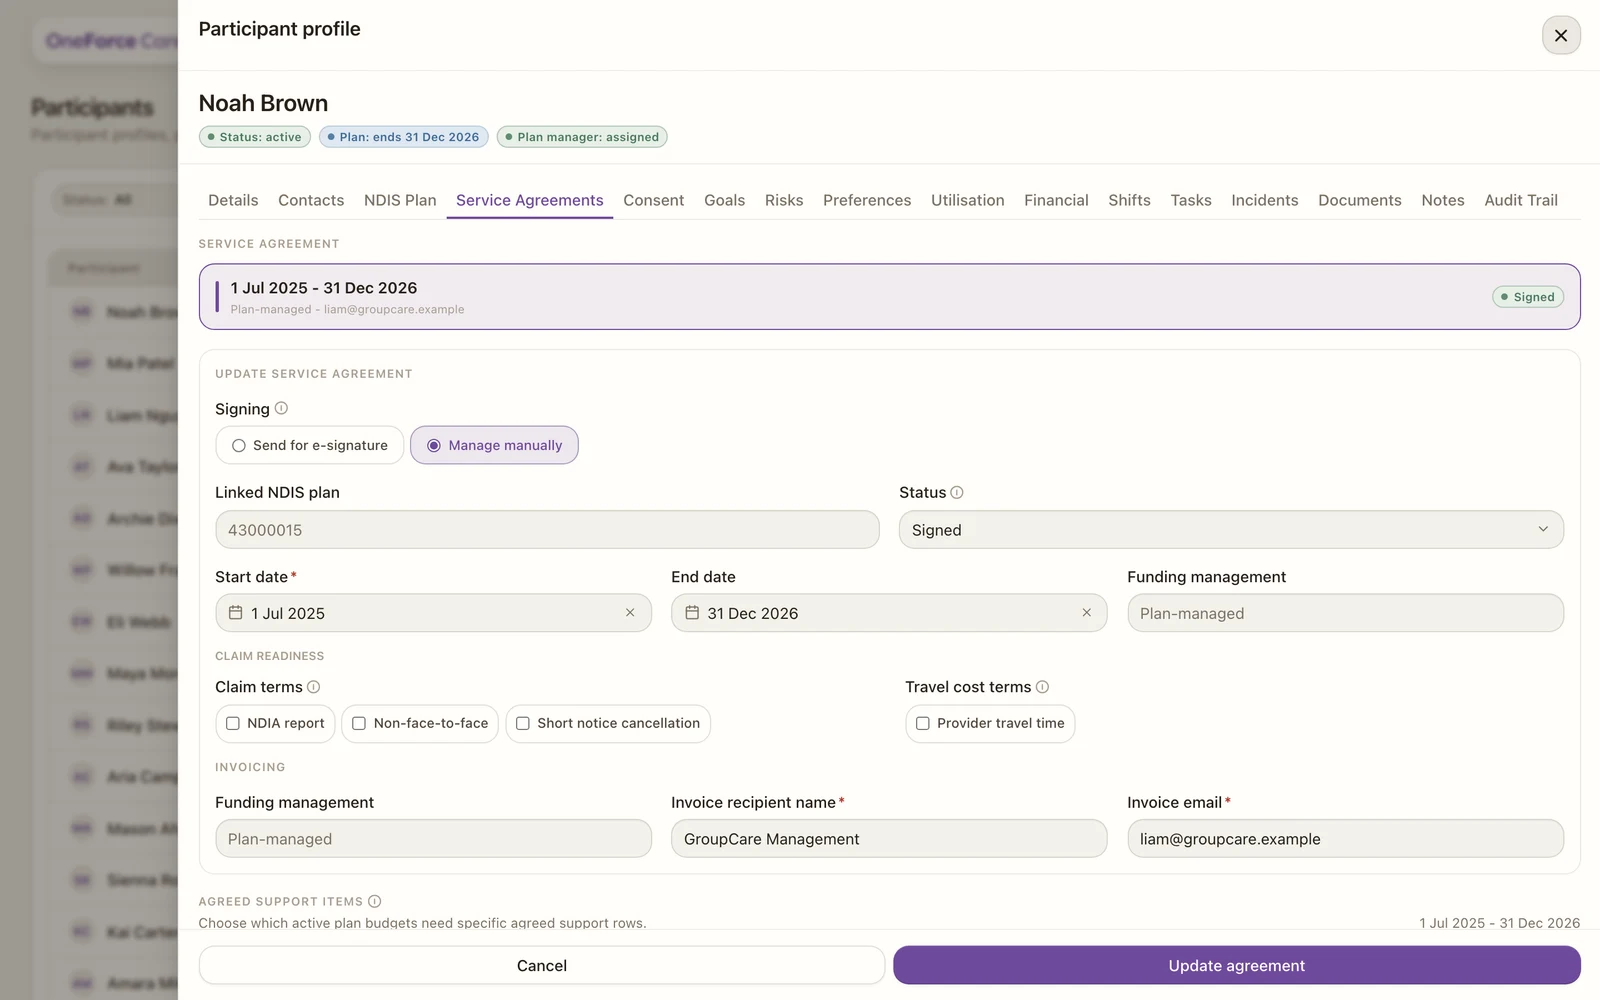
Signing: e-signature or manual
The Signing choice sets who collects the signatures:
- Send for e-signature: emails both parties a signing link and updates the status automatically. OneForce Care marks the agreement Signed once everyone has signed and files a signed PDF.
- Manage manually: you handle signing yourself (on paper, for example), set the Status (Draft, Sent or Signed) by hand, and can upload a scan of the signed copy.
Start date and End date are both required. Leave the end date blank and saving is blocked with Agreement end date is required. The agreement cannot start before the plan starts or end after the plan ends, checked when you save.
Signatories (e-signature)
In e-signature mode you choose two signatories:
- Participant signatory: a picker of the participant plus their contacts. It defaults to the participant. If the person you pick has no email on file, you see No email on file. and cannot send until one is added.
- Provider signatory: who signs on behalf of the workspace. The list is your workspace contact first, then every worker in your organisation who has an email on file.
Both are required before you can send.
Agreed support items (where Stated matters)
This section reads directly from the plan’s budget pools, and the Stated versus Flexible choice from the plan drives it. Enable it, choose which budgets to itemise, then add a support item per budget.
- Only the plan’s active budget pools appear here.
- A Stated pool needs its NDIS support codes added, or shifts that draw on it have nothing claimable.
- A Flexible pool is optional. Itemise it only if you want to lock in specific agreed rates.
Watch out
If a Stated budget has no agreed support codes, shifts that use it cannot be claimed. Add the codes here so delivery can flow through to an invoice.
Where a support item requires a quote, you also record the Quote reference, Approved date, Approved rate, Approved amount and a Quote document.
Claim readiness
The Claim readiness section decides which clauses go into the agreement, and with them what your team is allowed to claim. Claim terms is a row of tick pills; tick the ones the participant has agreed to:
| Claim term | What it allows |
|---|---|
| NDIA report | Time spent writing the reports the NDIA requires. |
| Non-face-to-face | Time spent on the participant’s support while not with them, for example writing notes or preparing resources. |
| Short notice cancellation | Up to 100% of the agreed price when a support is cancelled inside the notice period. |
| Whole support at higher band | When one worker delivers a support that crosses a time-band boundary, billing the whole support at the higher band’s limit rather than splitting it. It only applies where the higher band’s code is already an agreed support. |
| Provider travel time | Worker travel to the participant and back, capped by the plan’s remoteness level. |
Agreed cancellation notice sits beside the pills, and only appears once Short notice cancellation is ticked, since without that term no short-notice charge is ever claimable. Enter the notice in days. Leave it blank to use the NDIS defaults, shown as the NDIS default placeholder. An agreed period applies per support and only where it is tighter than the NDIS default; it never extends it.
Invoicing
The Invoicing section is who the invoices go to, and it follows the plan’s funding type. For each funding style that needs a contact, the read-only Funding management is shown alongside an Invoice recipient name and a valid Invoice email, both required:
- Plan-managed: one contact, the plan manager.
- Self-managed: one contact, the participant or their nominee.
- NDIA-managed: no invoice contact, since you claim from the NDIA directly.
- Mixed: one contact for each of the plan-managed and self-managed styles present across the active pools. Any NDIA-managed pool needs nothing, so a plan that is entirely NDIA-managed shows no Invoicing section at all.
A plan manager you added under Contacts can be used as the recipient. Leaving either field empty shows Recipient name is required. or Invoice email is required., and a malformed address shows Enter a valid email address.
The NDIS Establishment Fee prompt
Once an agreement is Signed, a prompt bar can appear above it headed NDIS Establishment Fee. It tells you the participant looks eligible for the fee: a first-time participant with at least 20 committed Cat 01/04 hours a month over a term of three months or more. It is a nudge, not a claim, and it exists because the fee is easy to miss.
- Select Add establishment-fee task to raise the task for it. You see Establishment-fee task added., the bar disappears, and the task is then worked from Tasks.
- Select the cross at the right to dismiss the prompt without raising anything. It does not come back for this agreement.
The bar only shows while the agreement is signed, the participant looks eligible, and it has not already been actioned or dismissed, so it is there only when there is something to act on.
Create, update or send
- For a new agreement, select Create agreement. You see Service agreement created.
- For an existing one, select Update agreement. You see Service agreement updated.
- In e-signature mode, select Send for signatures. If a signatory email is missing you see Missing before sending: listing exactly what is needed. Otherwise the agreement goes out and the status moves to Sent.
While an agreement is out for signature
Once you send, the top of the tab shows a signing status card. While it is waiting it reads Sent for signing, with the line Waiting for signatures. The status updates automatically when everyone has signed. You do not need to check back; the status flips to Agreement signed on its own.
Cancel a signing request
If you need to change an agreement that is out for signature, select Cancel signing request at the bottom. A dialog headed Cancel signing request warns: “This voids the pending signing links and emails both signers to let them know. The agreement returns to draft so you can make changes and re-send it.” Select Cancel to confirm (or Keep request to leave it alone). The agreement returns to Draft and you see Signing request cancelled., ready to edit and send again.
Re-send or supersede a signed agreement
To change an agreement that is already Signed, edit it and select Update agreement, then send it again. A dialog headed Send updated agreement confirms: “This sends the updated agreement for signature. Once everyone signs, it supersedes the currently signed agreement.” Select Send. The previously signed copy stays in the document register until the new one is signed. If you have not changed anything, you are told No changes to send. Update the agreement first.
Note
In manual mode you never send anything: set the Status yourself, and upload the signed scan when you have it. The signing status card and the Cancel and re-send flows only apply to e-signature agreements.
Agreement content and custom terms
When preparing the agreement for signing, open Agreement content to review the included sections. Standard section titles stay fixed. You can edit their wording and choose which sections to include.
To add a section specific to this agreement:
- Select Add a term, below the existing terms.
- Enter the Term title and its wording.
- Keep the section selected if it belongs in the agreement, or remove a custom section with Remove term.
- Review the complete agreement before sending it for signing.
Custom titles and wording carry into the agreement document and signing copy. Lines beginning with a hyphen and a space are presented as bullet points in the document.