Browse help topics
Scheduling overview
Planner (Day and Week) and Table views, date navigation, drag to create/move/resize/reassign, and how to find shifts.
Last updated · 23 September 2026
Scheduling is your roster. It is where you create support shifts, assign workers, and review what was delivered. Open it from Schedule›Scheduling.
Note
Scheduling respects your role. If your role cannot create, edit or assign shifts, the page shows “Read-only. Your role cannot create, edit, or assign shifts.” and the Add shift button and drag actions are hidden. If your account has no active provider workspace, you see “This user is not linked to an active provider workspace yet.” instead of the roster.
The two views
A toggle at the top right switches how the same shifts are displayed.
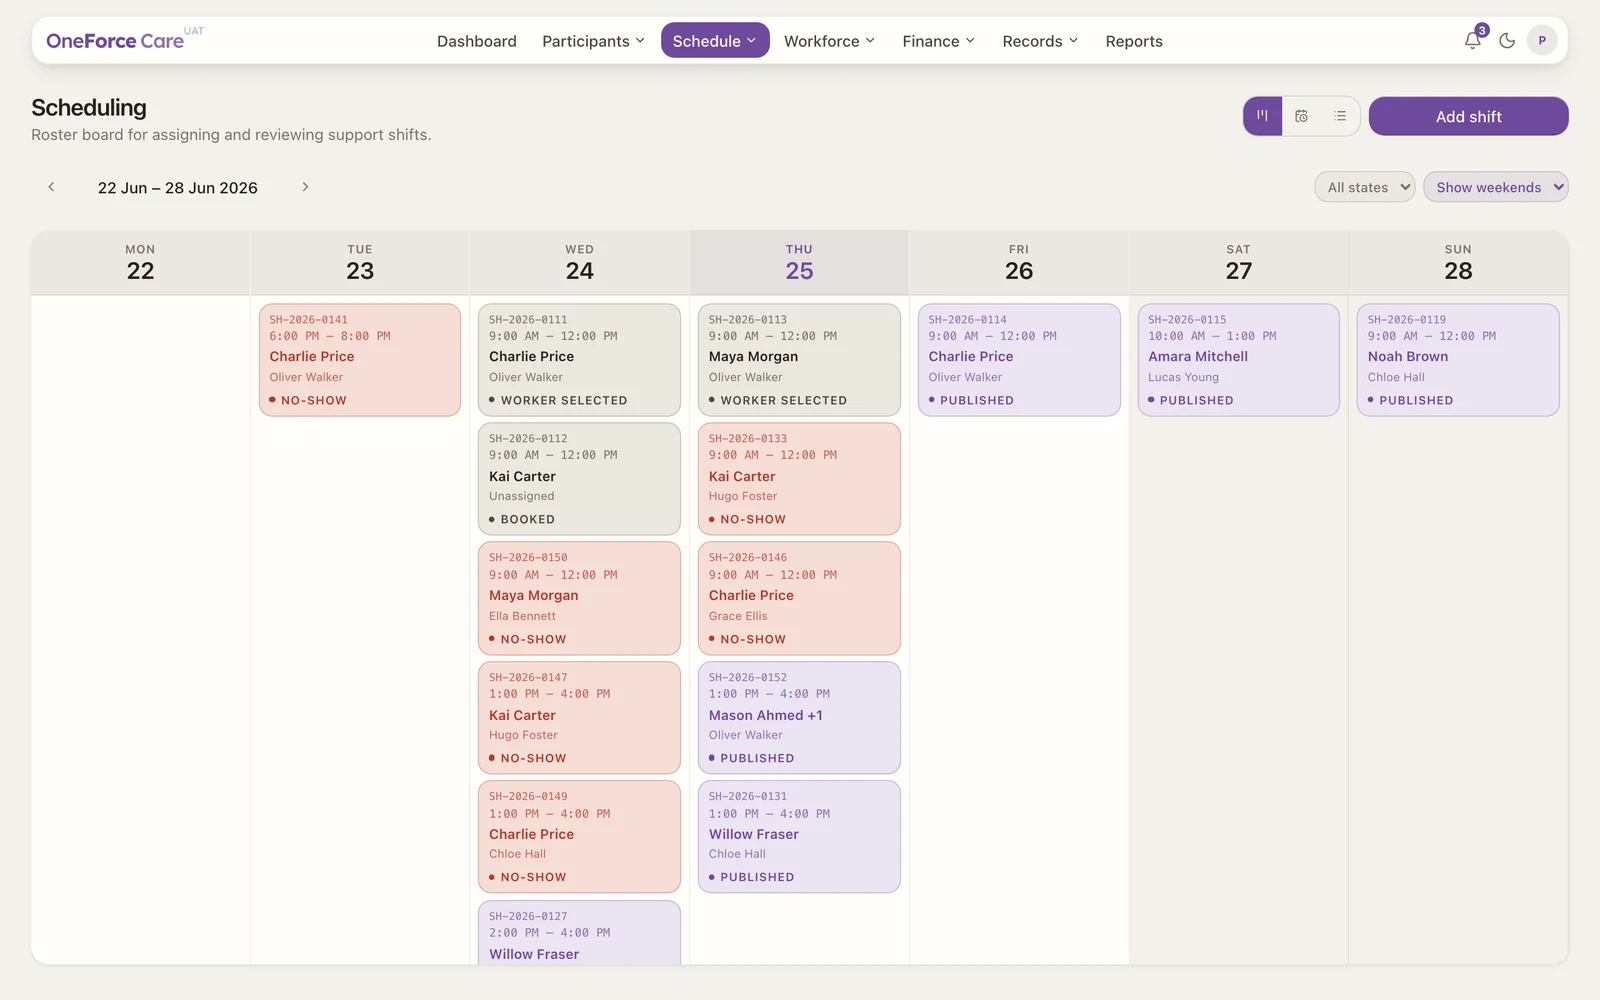
| View | What you see |
|---|---|
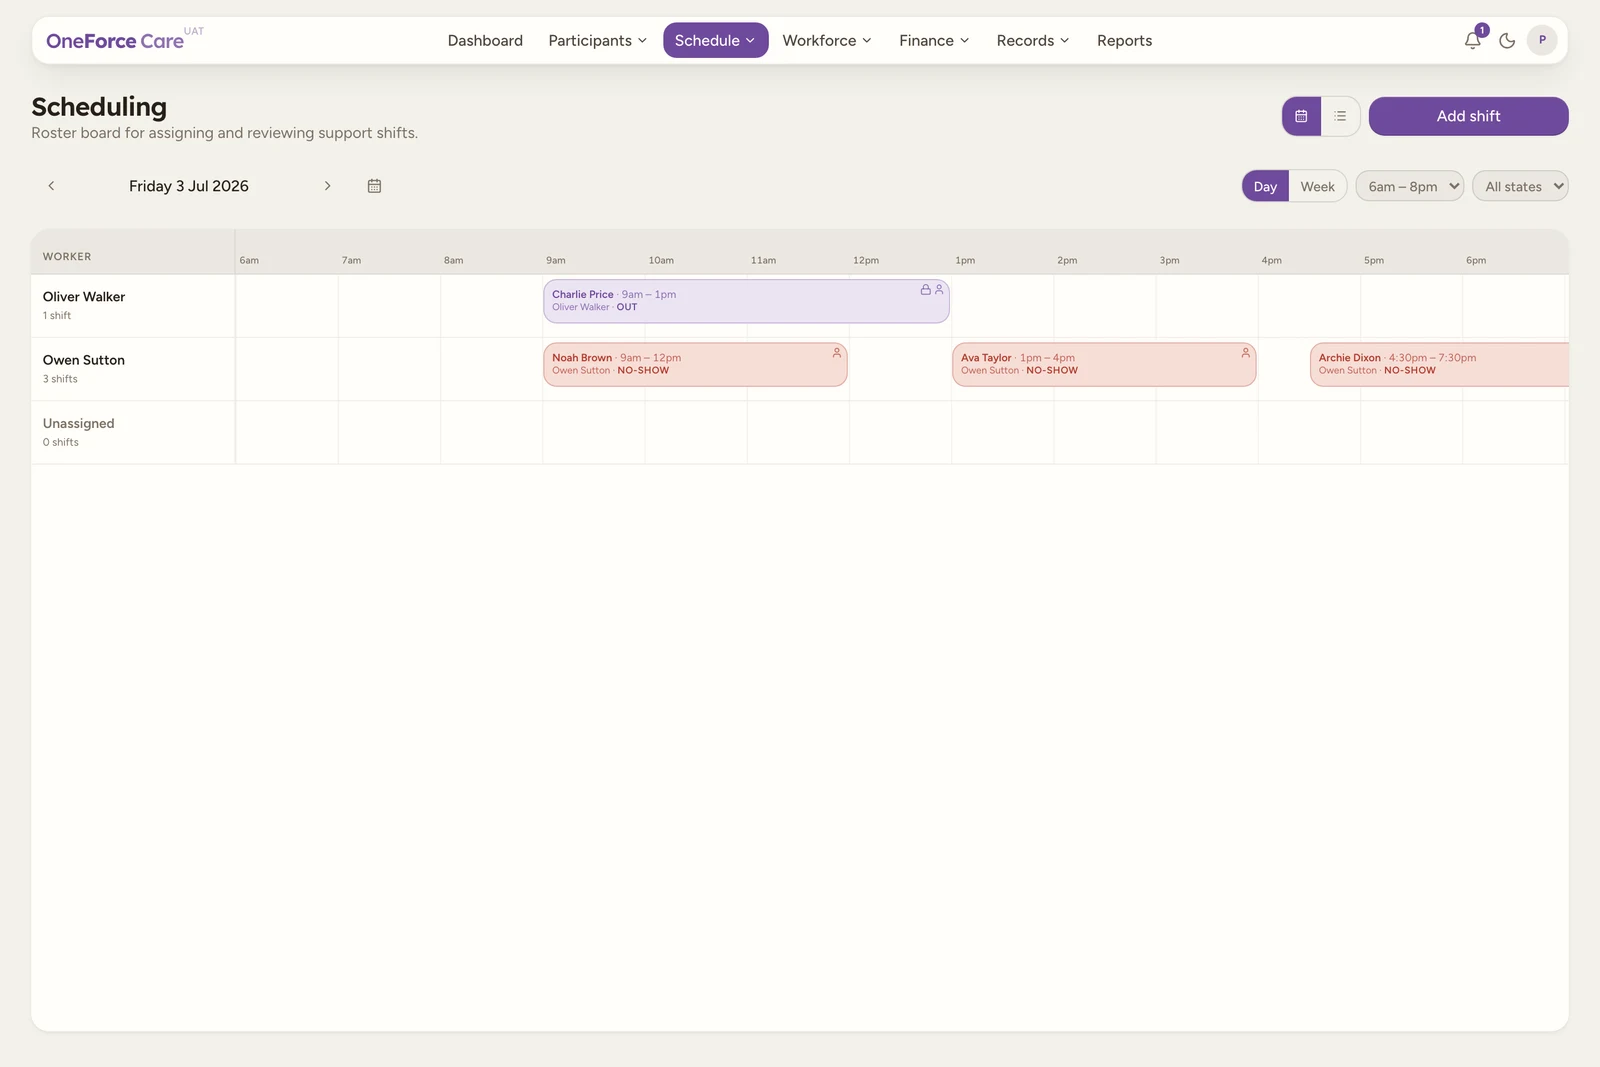
| Planner | A drag-and-drop grid, one row per worker. Day mode shows a single day as an hour-by-hour timeline per worker; Week mode shows the whole week, one column per day, cards stacked inside each worker’s row. An Unassigned row always sits last, for shifts with no worker yet. |
| Table | A flat list of shifts with Date, Status, Time, Participant and Worker columns. Best for searching across a date range or filtering. |
Tip
Ready to build your roster? Start with Create a shift, then Assign a worker.
Moving around the Planner
Step one day or one week at a time with the arrows either side of the date range, or select the calendar icon next to them to jump straight to a date. A Today button appears whenever you have navigated away from the current period.
Your selected Day or Week view is remembered in this browser. The controls announce View saved. when the preference is kept.
Day and Week mode share a row of controls under the date:
- Day / Week switches mode. This toggle is hidden on a phone, which is always Day mode; step through days with the tab strip instead of a Week grid.
- 6am – 8pm / 24 hours (Day mode only) sets how much of the day the timeline shows. The axis widens on its own to take in an out-of-window shift, so a 5am start or a 9pm finish always draws in full.
- The state dropdown highlights public holidays for the chosen state on the visible day or week.
Creating and moving shifts by dragging
The Planner has no separate “new shift” form on the grid itself: you create, move, resize and reassign shifts by acting directly on the grid.
- Create: select and drag across an empty stretch of a worker’s row (Day mode) to paint a start and end time, or just click an empty spot for a default one-hour slot. In Week mode a click books a default 9am-10am slot on that worker’s day. Either way the Add shift drawer opens prefilled with that date, time and worker, shown as a removable “Will be assigned to
<worker>” chip; finish the rest of the form and select Create shift as normal. Clicking or dragging in the Unassigned row creates a shift with no worker. - Move: drag an existing shift to a new time (Day mode) or a new day (Week mode). Drop it in a different worker’s row to reassign that worker in the same move; drop it in the Unassigned row to unassign it. A short pause after picking the shift up shows a live preview of the new time before you let go.
- Resize: in Day mode, drag the left or right edge of a shift to change its start or end time. Week mode cards are click-only for timing; open the shift to change its duration precisely.
- Open: select a shift without dragging it to open the Edit Shift drawer.
Note
A shift that has started (a worker clocked in, or provider travel began), is Approved, or is Cancelled shows a lock icon and cannot be dragged; open it in the editor instead. Moving a merely Published shift is allowed and re-notifies the worker, the same as saving a change in the edit form. Rescheduling a shift that asked for worker acceptance also resets the worker’s answer, so they are asked again. A move must pass the current scheduling checks, including approved availability for the whole new shift time. If it is refused, read the message and resolve the conflict before trying again.
Finding shifts in the Table
Switch to the Table view to search and filter the roster. A period bar above the table steps through Day, Week, Month, Year or All (with the same jump-to-date and Today controls as the Planner).
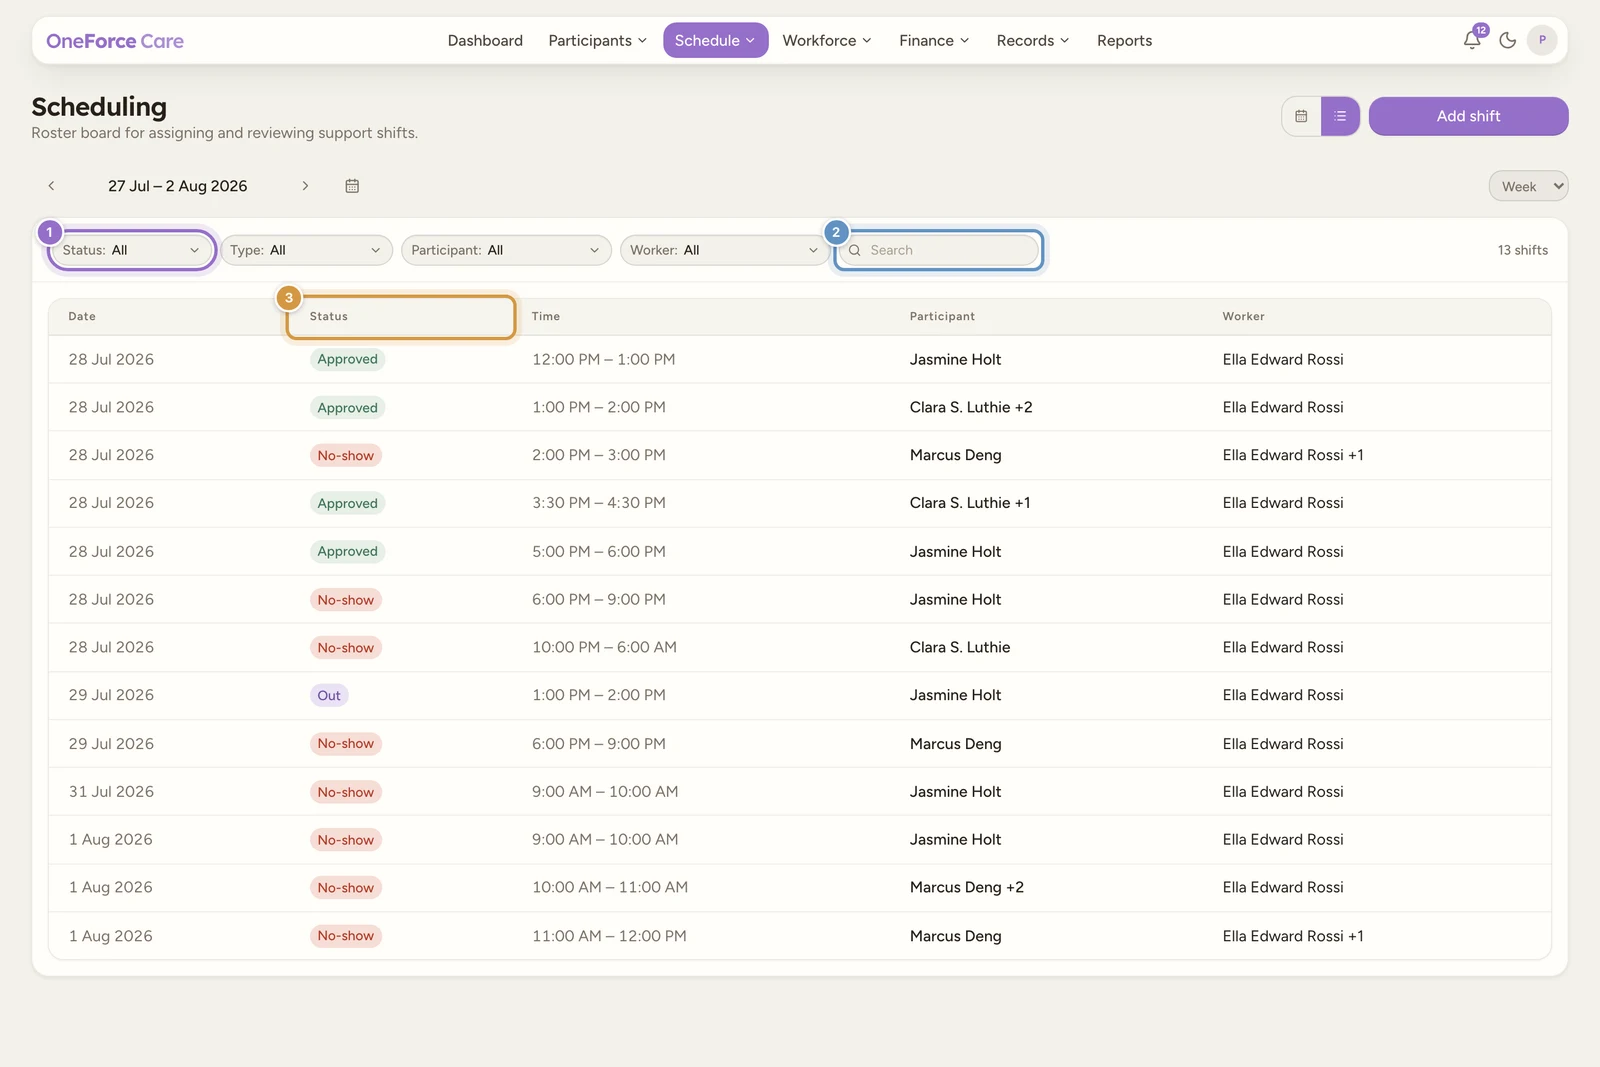
Four dropdowns and a search box narrow the list:
- Status narrows to a single shift status. The options, in order, are All, Draft, Booked, Published, Partly published, Awaiting worker, Accepted, Completed, Approved, Declined and Cancelled. The three acceptance options sit with the publish states they follow, and Declined sits beside Cancelled where the list keeps the states that need action from you. See Shift statuses.
- Type narrows to Direct support or Group support.
- Participant narrows to one participant.
- Worker narrows to one worker.
- Search matches across the shifts in the current period.
Select any row to open that shift.
Set availability before building the week
Use Workforce > Availability to collect casual responses, approve hours and manage regular hours and leave. A worker with no saved approved availability cannot be assigned. Changing a shift’s time is checked against the new hours too.
Repeat series can span up to 90 calendar days. You can archive one occurrence, that occurrence and future shifts, or the entire eligible series. No-show shifts cannot be edited or rescheduled; copy or archive them instead. See Recurring shifts and copying.